Ice Cream Specials
Recipe: Ice Cream Cake
There is something about an ice cream cake that makes it extra special (more than just the usual scoops of ice cream or a normal cake).
I remember that as children, we used to love having an ice cream cake for celebrations. But they were always pretty expensive to buy - even the simplest ones. After much coaxing and drooling when we finally manage to convince our parents to buy one, the entire thing would be devoured in seconds :)

It took me a while to realize that ice-cream cakes were so easy to make and there are no fixed ingredients (except ice cream) as such. Contrary to the name, this dessert doesn't necessarily need to have a cake layer.
Let your imagination run wild and add different things in each layer of the dessert - fresh fruits, jelly, nuts, cake, caramel, chocolate, different flavours of ice-creams, whipped cream... This is one dessert that is limited only by the scope of your imagination.

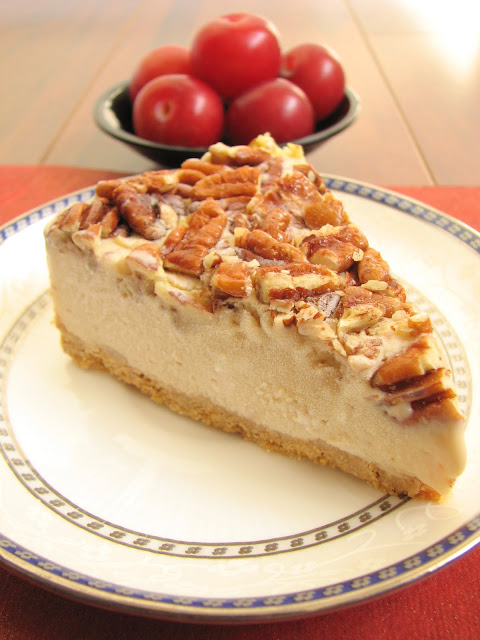
I decided to keep it simple this time and serve some my homemade butterscotch pecan ice-cream as an ice-cream cake :)

ICE CREAM CAKE
First prepare the cake tin to make the ice-cream cake in:
Take a cake tin of 8 inch diameter. If you have a cake tin with a removable base then it would be better. If not, its ok.
(If using a cake tin with a removable base, then take out the base)
Line the tin with a single large sheet of aluminium foil or cling wrap such that it has properly covered the inside of the tin and there is extra hanging over the sides of the tin (we need this to pull the ice-cream cake out of the tin).
If it is the cake tin with the removable base then place the base back inside the tin such that there is aluminium foil/cling wrap at the bottom of the tin and the tin base over it.
For the Base:
Digestive biscuits - 12 (This can also be subsituted with any other biscuit of choice such as marie biscuits or Oreos)
Salted butter - 50g (cold)
Crumble the biscuits to a fine powder. And then rub in cubes of cold butter until it is more or less uniformly combined and the mixture looks like wet sand. Then put this into the cake tin and press it firmly such that it is packed uniformly. Place the cake tin in the freezer for about 30 minutes
For the Layers:
I used Homemade Butterscotch Ice Cream and toasted pecans for the different layers.Sometimes, I also use my favourite flavour of store-bought ice cream especially when I'm pressed for time.
Defrost the ice cream till it is pourable. And pour into the cake tin over the biscuit layer. Top with toasted nuts. Lightly press down the toppings so that they stick to the ice-cream. And place it in the freezer till it becomes frozen completely (if you are not adding any more layers, freeze for at least 4-5 hours)
Alternately, different layers can also be added to this dessert such as Caramel sauce, Chocolate sauce etc, after an hour of freezing the previous ice cream layer. A cake layer in between will also be an interesting addition. Or even layers of ice cream of different flavours. Just make sure to freeze each layer for an hour before adding the next layer. And after the final layer has been added freeze for 4-5 hours
This can also be topped with fresh fruit slices and jelly just about 30 minutes before serving and returned to the freezer so that the jelly sets.


Comments
Post a Comment
Thank you for taking the time to visit my blog. Please let me know how you feel about the post.